Why Interior Spray Foam Application Is One of the Best Upgrades for Your Home
Interior spray foam application is the process of spraying a two-component polyurethane foam onto interior surfaces — walls, attics, basements, crawlspaces, and rim joists — to seal air leaks, add insulation, and control moisture all at once.
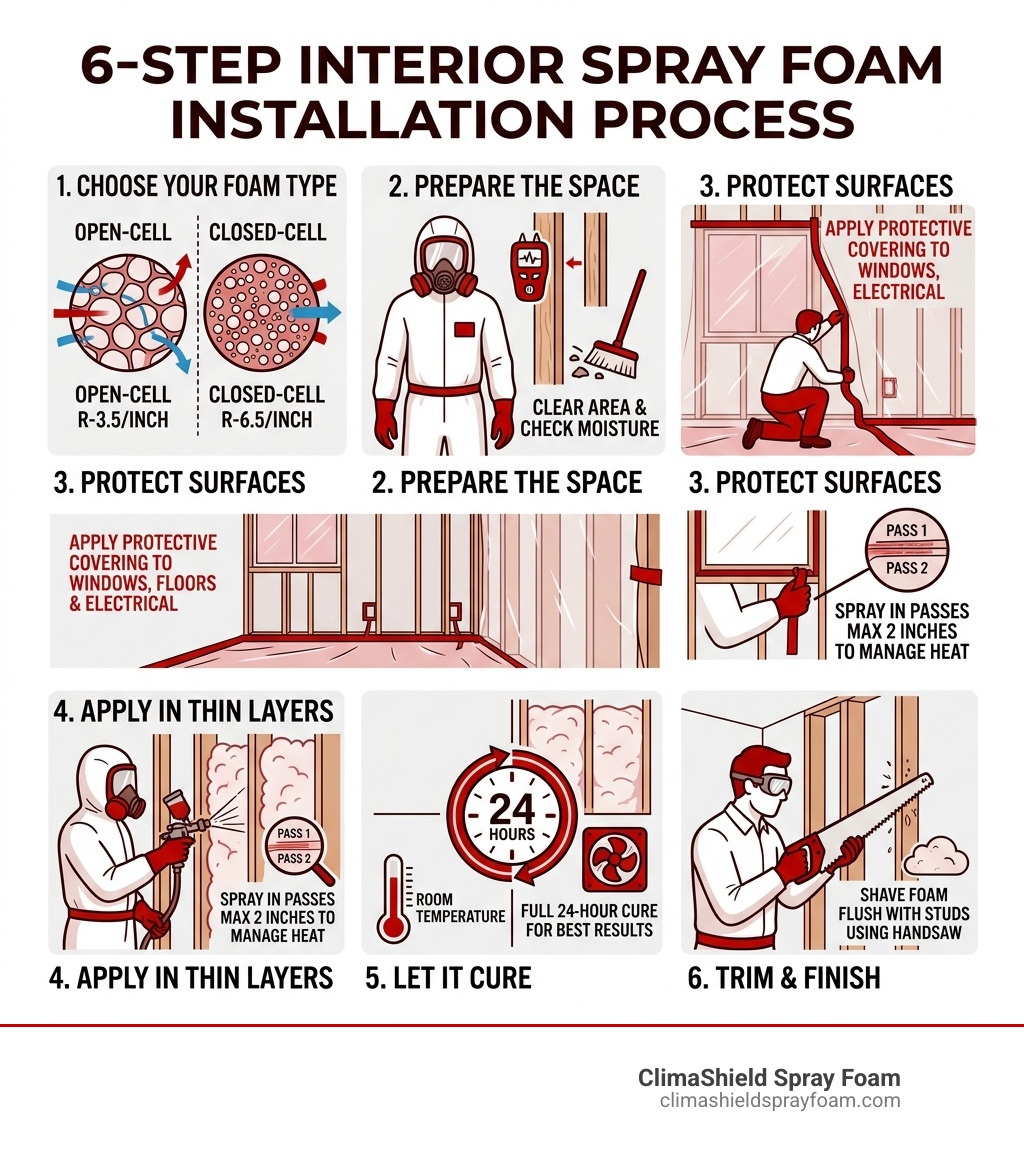
Here is a quick overview of how it works:
- Choose your foam type — open-cell (R-3.5/inch) or closed-cell (R-6.5/inch)
- Prepare the space — clear the area, check moisture levels, and put on full PPE
- Protect surfaces — cover windows, floors, and electrical boxes with plastic sheeting
- Apply in thin layers — spray in passes no thicker than 2 inches to manage heat buildup
- Let it cure — foam is tack-free in minutes but needs a full 24 hours to fully cure
- Trim and finish — shave excess foam flush with studs using a serrated knife or handsaw
Your home loses a significant amount of heated and cooled air through gaps, cracks, and poorly insulated walls. According to Energy Star, proper sealing and insulation can cut heating and cooling costs by 7% to 20% — and retrofit projects using spray foam have shown average energy savings of 20% to 50%.
That is a meaningful return. But getting those results depends entirely on choosing the right foam, preparing correctly, and applying it the right way.
This guide walks you through every step.
I’m Dave Brocious, founder of ClimaShield Industries and a specialty coatings contractor with over 20 years of experience in the coatings industry, including direct hands-on work with interior spray foam application across residential and commercial projects throughout Western PA. I’ll share what actually works in the field — not just what looks good on paper.
Understanding Foam Types for Interior Spray Foam Application
Before you pull the trigger on a spray gun, you need to know which material is right for your specific project. In interior spray foam application, we primarily deal with two types: open-cell and closed-cell.
Open-Cell Spray Foam
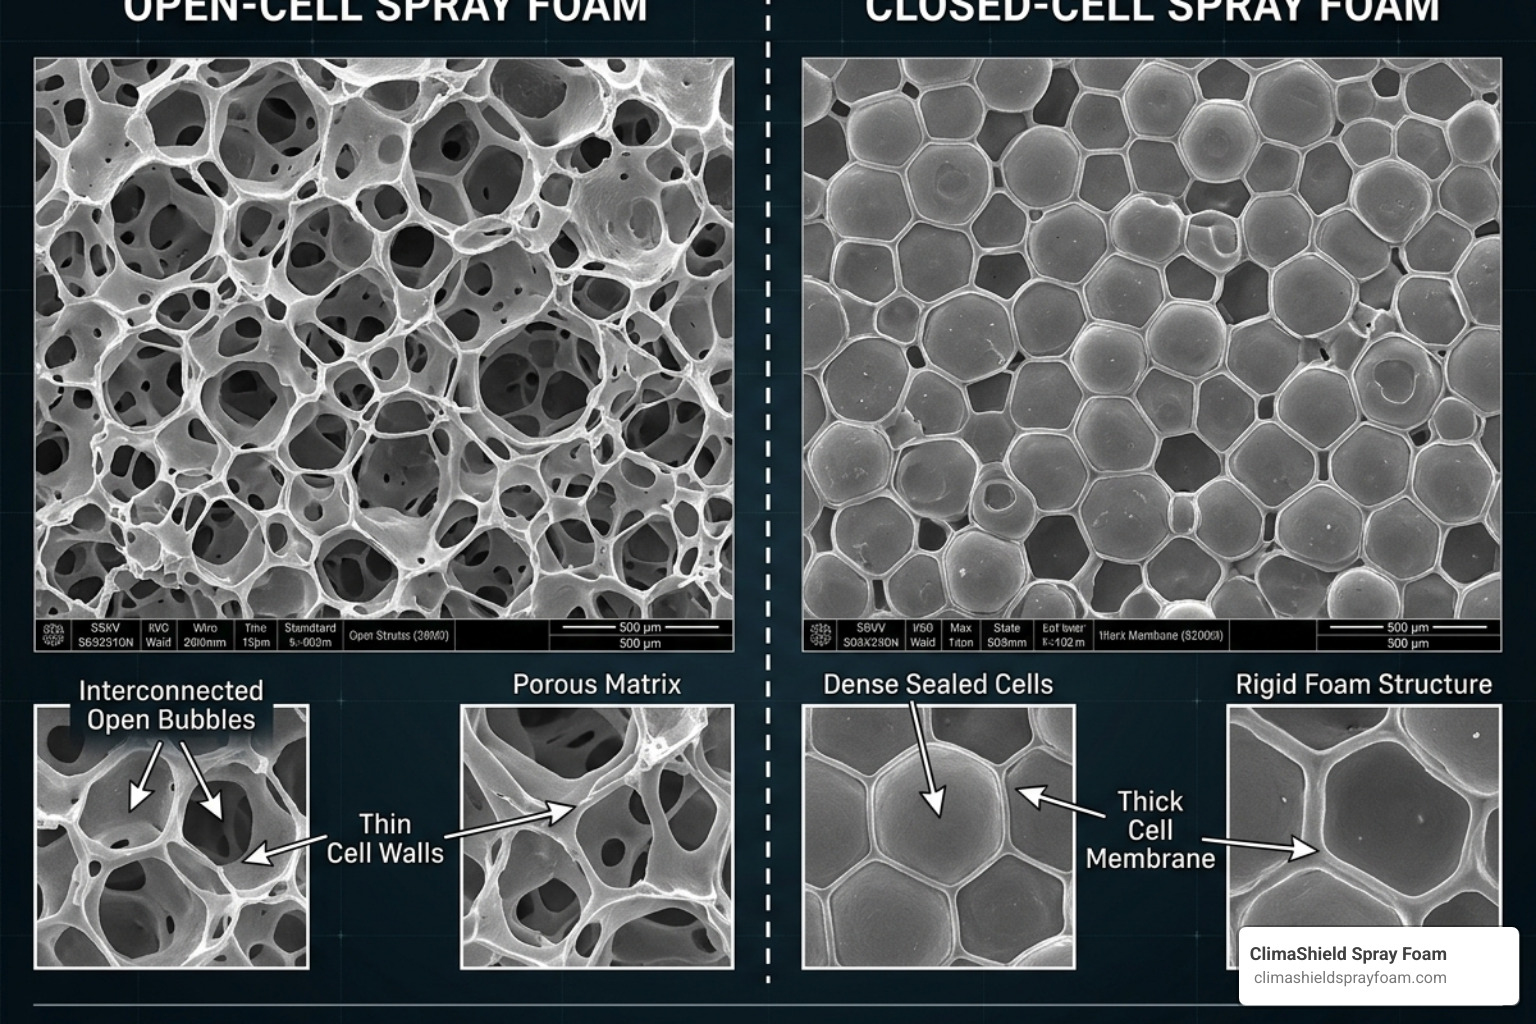
Open-cell foam is lightweight and flexible. Its cells are intentionally left “open,” making it soft to the touch—think of it like a dense sponge. Because it expands up to 100 times its liquid volume, it is fantastic for filling large, odd-shaped cavities in interior walls or attics. It’s also an excellent soundproofing material, making it a favorite for nurseries or media rooms. However, it is not a vapor barrier, meaning it can allow moisture to pass through.
Closed-Cell Spray Foam
Closed-cell foam is the heavyweight champion of insulation. The cells are packed tight and filled with a gas that helps the foam expand and provides high thermal resistance. It expands about 30-40 times its liquid volume and cures into a rock-hard state. Because of its density, it acts as a built-in vapor barrier and even adds structural “racking strength” to your walls. In Western PA, where we deal with significant humidity and cold winters, closed-cell is often preferred for basements and rim joists.
R-Value and Performance Comparison
The “R-value” measures how well a material resists heat flow. The higher the number, the better the insulation.
| Feature | Open-Cell Foam | Closed-Cell Foam |
|---|---|---|
| R-Value per Inch | 3.5 – 3.6 | 6.5 – 7.0 |
| Density | 0.5 lb/ft³ | 2.0 lb/ft³ |
| Expansion Rate | 100x | 30-40x |
| Vapor Barrier? | No | Yes (at 1.5″+ thickness) |
| Best Use | Interior walls, soundproofing | Basements, crawlspaces, exterior walls |
Choosing the right material is the first step toward success. You can learn more about Choosing the Right Spray Foam for Your Home or dive deeper into costs and benefits by Exploring Insulation Types, Perks, and Prices.
Essential Safety and Preparation for Interior Spray Foam Application
If you’re planning a DIY interior spray foam application, safety isn’t just a suggestion—it’s the law of the land. The chemicals used (isocyanates and polyol resins) are safe once cured, but during application, they can be hazardous to your lungs, eyes, and skin.
Personal Protective Equipment (PPE)
You shouldn’t have a single inch of skin exposed. We recommend:
- Full-body coveralls (Tyvek suit) with a hood.
- Respirator: A NIOSH-approved respirator with organic vapor cartridges is mandatory. For large projects, professionals use supplied-air respirators.
- Gloves and Eye Protection: Chemical-resistant gloves (taped to your sleeves) and unvented goggles.
- Pro Tip: Wear shoes you don’t mind throwing away. Spray foam is notoriously difficult to remove from fabric and rubber.
Preparing the Substrate
Spray foam won’t stick to a dirty or wet surface. You need to ensure the area is ready for the chemical bond.
- Check Moisture Levels: Use a moisture meter. For wood substrates, moisture content must be below 18% to 20%. If the wood is damp, the foam will pull away as it cures, creating “air bypasses.”
- Temperature Matters: The substrate (the surface you’re spraying) should ideally be between 60°F and 80°F. If it’s too cold, the chemical reaction won’t happen correctly, leading to poor adhesion.
- Clear the Area: Remove all furniture and wall hangings. The vibrations from the equipment can actually knock pictures off walls in adjacent rooms!
- Masking: Use plastic sheeting and tape to cover everything you don’t want “foamed”—windows, doors, and electrical boxes.
For a comprehensive look at what tools you’ll need, check out this guide on How to Apply DIY Spray Foam Insulation and our Residential Insulation Complete Guide. Understanding the various Uses of Spray Foam can also help you identify other areas in your home that might need attention.
Step-by-Step Guide to Applying Spray Foam in Walls and Attics
Applying spray foam is more of an art than a science. It requires a steady hand and a “sweeping” motion.
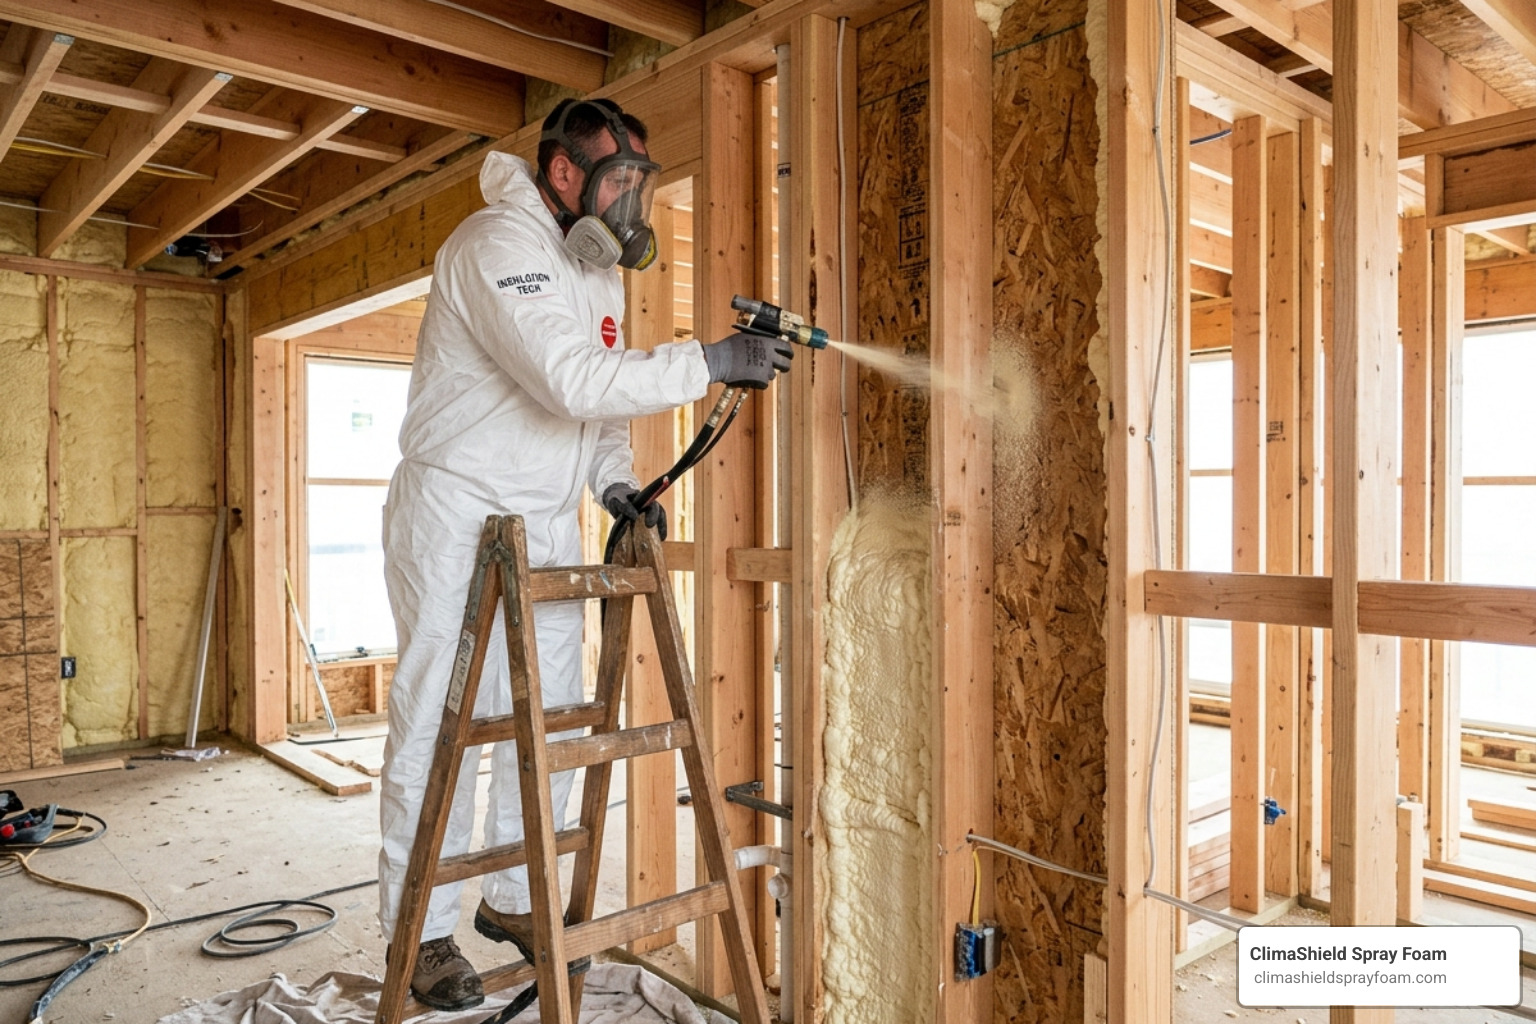
The Application Process
- Test Spray: Always start by spraying into a cardboard box. This verifies the “A” and “B” chemicals are mixing at the correct 1:1 ratio. If the foam looks crunchy or discolored, your lines might be clogged.
- The Perimeter First: Start by spraying the perimeter of the wall cavity. This creates a “picture frame” seal.
- Layering (Lifts): Never spray more than 2 inches of closed-cell foam in a single pass. The chemical reaction is “exothermic,” meaning it generates heat. If you spray it too thick, the heat can get trapped, causing the foam to char or even pose a fire risk.
- Distance: Hold the spray gun 12 to 18 inches from the surface. A consistent distance ensures a consistent thickness.
- Bottom-Up: In wall cavities, work from the bottom up to prevent voids.
Trimming and Finishing
Once the foam has expanded and hardened (usually within 5-10 minutes for a “tack-free” state), you may find it has expanded past the wall studs. You’ll need to use a long serrated knife or a handsaw to shave the excess foam flush with the studs so you can reinstall drywall.
For more detailed tips, you can read How to Install Spray Foam Insulation Like a Pro. If you are focusing specifically on the top of your house, our guide on Attic Spray Foam is an essential read, along with our general Residential Insulation overview.
Advanced Techniques: Retrofitting Existing Walls and Basements
What if your walls are already closed up with drywall? You can still benefit from interior spray foam application through a process called injection.
Injection Foam for Existing Walls
Instead of tearing down your walls, professionals (and very brave DIYers) can drill small holes (usually 1 inch or less) into each stud cavity. A specialized, slow-expanding foam is then injected into the hole.
- The Risk: Standard spray foam expands with a lot of force. If you use the wrong type in a closed wall, it can literally pop the drywall off the studs or cause it to bubble and crack.
- The Solution: Use injection-grade foam designed for “blind” cavities.
Basements and Rim Joists
The rim joist (where your house’s wood frame meets the concrete foundation) is often the leakiest part of a home.
Applying closed-cell foam here is a game-changer for cold floors. It stops the “stack effect” where cold air is sucked into your basement and pushed up into your living spaces. For more on this, see our article on Air Sealing Basement areas and our honest take on the Pros and Cons of Rim Joist Spray Foam.
Post-Application: Curing, Cleanup, and Building Codes
Once the spraying is done, the work isn’t quite over. You need to manage the environment while the foam “cures.”
Curing and Re-entry
Even though the foam feels hard to the touch in minutes, it continues to off-gas Volatile Organic Compounds (VOCs) for several hours.
- 24-Hour Rule: We strictly recommend that occupants (and pets!) stay out of the home for at least 24 hours after a major interior spray foam application.
- Ventilation: Use industrial fans to create negative pressure, pulling air out of the treated room and exhausting it outside.
Cleanup
- Uncured Foam: If you get wet foam on a surface, clean it immediately with acetone or a specialized foam cleaner.
- Cured Foam: Once it’s hard, the only way to get it off is mechanical—scraping, sanding, or cutting.
- Skin: If you get it on your skin, do not use solvents. Use a mix of warm soapy water and a bit of patience (or petroleum jelly).
Building Codes and Fire Safety
In Pennsylvania, building codes generally require that spray foam be covered by a “thermal barrier,” such as 1/2-inch drywall, because polyurethane foam is combustible. If you are leaving the foam exposed in an attic or crawlspace, you may need to apply an intumescent (fire-resistant) coating to meet Class A fire ratings.
Before you start, it’s wise to look into Hiring Basement Spray Foam Contractors Without the Headache to see if a pro might be better for your complex project, and check out our Commercial Insulation Complete Guide for code-heavy applications.
Frequently Asked Questions about Interior Insulation
Can I use interior spray foam application on existing walls without removing drywall?
Yes, but it requires extreme caution. The “drill and fill” method uses 1-inch holes to inject slow-expanding foam. However, because you can’t see inside the wall, there is a risk of hitting electrical wires or not filling the cavity completely. Most homeowners find that for a whole-home retrofit, professional rigs are safer because they can precisely control the pressure and volume.
What is the recommended R-value for interior spray foam application?
In Indiana, PA, and the surrounding regions (Climate Zone 5), the International Energy Conservation Code (IECC) typically recommends R-49 to R-60 for attics and R-13 to R-21 for walls. To achieve R-38 in an attic with closed-cell foam, you would need about 6 inches of material.
How long does it take for interior spray foam to fully cure?
While the foam becomes “tack-free” (not sticky) in about 7 to 12 minutes, it takes a full 24 hours to finish its chemical reaction and stop off-gassing. Factors like high humidity or very cold temperatures can extend this window.
Conclusion
At ClimaShield Spray Foam, we’ve seen how a proper interior spray foam application can transform a drafty, expensive-to-run house into a cozy, energy-efficient home. With the potential to save up to 60% on your energy bills, it’s an investment that pays for itself in just a few years. Plus, the added benefits of mold resistance and pest prevention make it a superior choice for the Western PA climate.
Whether you decide to tackle a small gap-and-crack project yourself or hire us for a full-home envelope seal, the goal is the same: a more comfortable, durable space. If you’re ready to see what a professional team can do for your property, explore our Residential Spray Foam Insulation Western PA services today.