Is Your Home Leaking Heat? Here’s What Retrofit Spray Foam Insulation Can Do
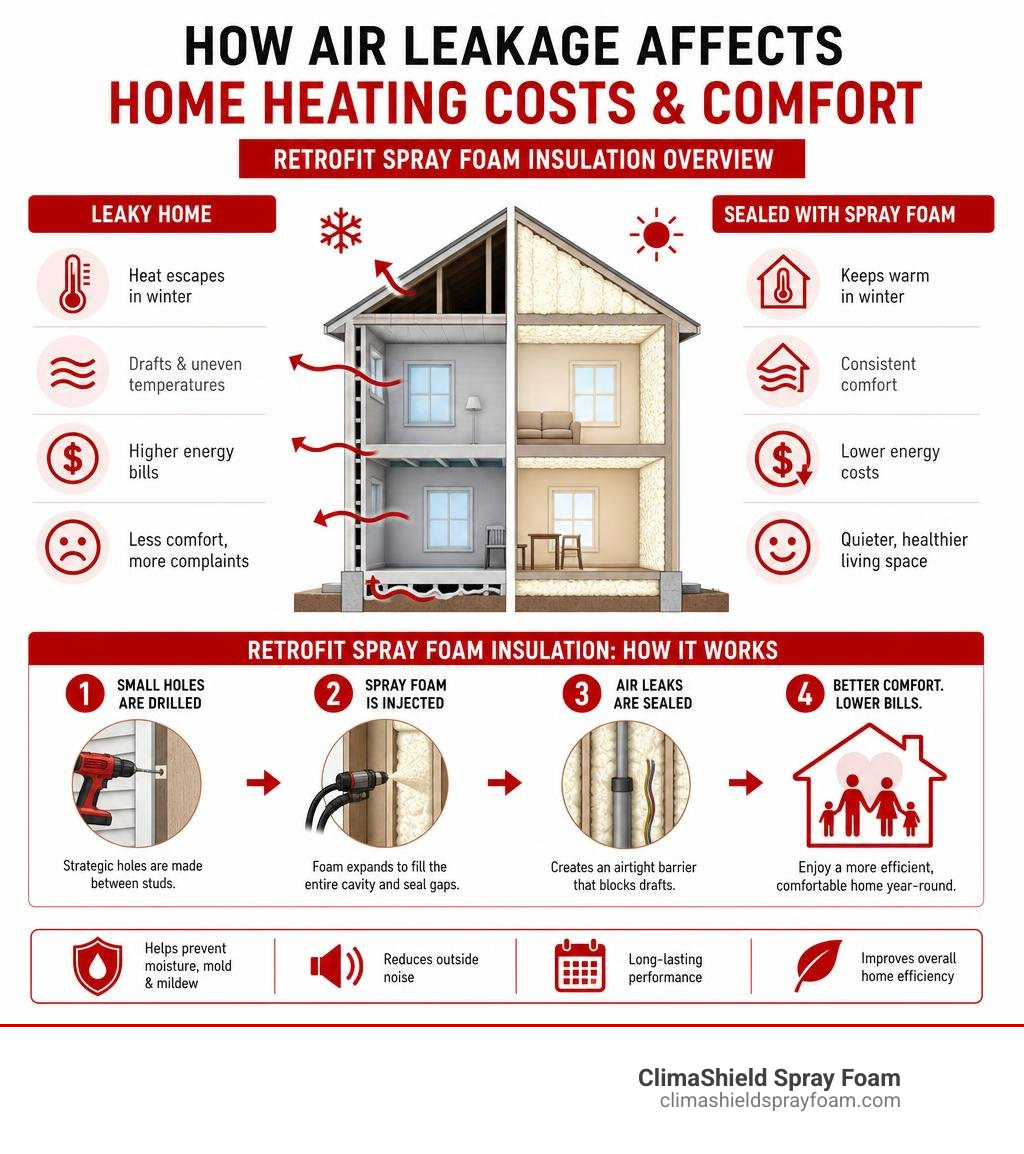
Retrofit spray foam insulation is a method of adding spray foam to the walls, attic, or crawl spaces of an existing building — without a full teardown or remodel. It fills wall cavities through small drilled holes, sealing air leaks and improving thermal performance from the inside out.
Quick Answer: What does retrofit spray foam insulation do?
- Fills existing wall cavities through small drilled holes
- Creates an airtight seal that stops drafts and air leakage
- Can reduce monthly energy bills by up to 50%
- Prevents moisture buildup that leads to mold and mildew
- Reduces outside noise entering the home
- Lasts up to 80 years when properly installed
If your home runs hot in summer, cold in winter, and your energy bills never seem to budge — the problem is almost certainly air leakage. Most older homes were built with fiberglass batts or loose-fill cellulose. Both materials allow air to move through wall cavities freely. That means your heating and cooling system is constantly fighting against the outside.
The good news: you don’t need to gut your walls to fix it.
Spray foam can be injected into existing wall cavities with minimal disruption — no demolished drywall, no weeks of construction mess. It expands to fill the cavity, seals gaps around studs and pipes, and hardens into a durable thermal barrier.
This guide walks you through everything you need to know before upgrading your home’s insulation — from product types and installation steps to real costs and performance data.
I’m Dave Brocious, founder of ClimaShield Industries and a specialist in retrofit spray foam insulation with hands-on experience across residential and commercial applications throughout Western Pennsylvania. With 20 years in the coatings and specialty contracting industry, I’ve seen how the right insulation upgrade transforms a drafty, uncomfortable building into an energy-efficient one. In the sections ahead, I’ll break down exactly how to approach this upgrade the right way.
Retrofit spray foam insulation word guide:
Why Retrofit Spray Foam Insulation is the Ultimate Home Upgrade
When we think about home comfort, we often focus on the thermostat setting. However, the real culprit behind high bills and drafty rooms is air movement. Traditional insulation materials like fiberglass and cellulose only slow down conductive heat transfer; they do absolutely nothing to stop air from passing through.
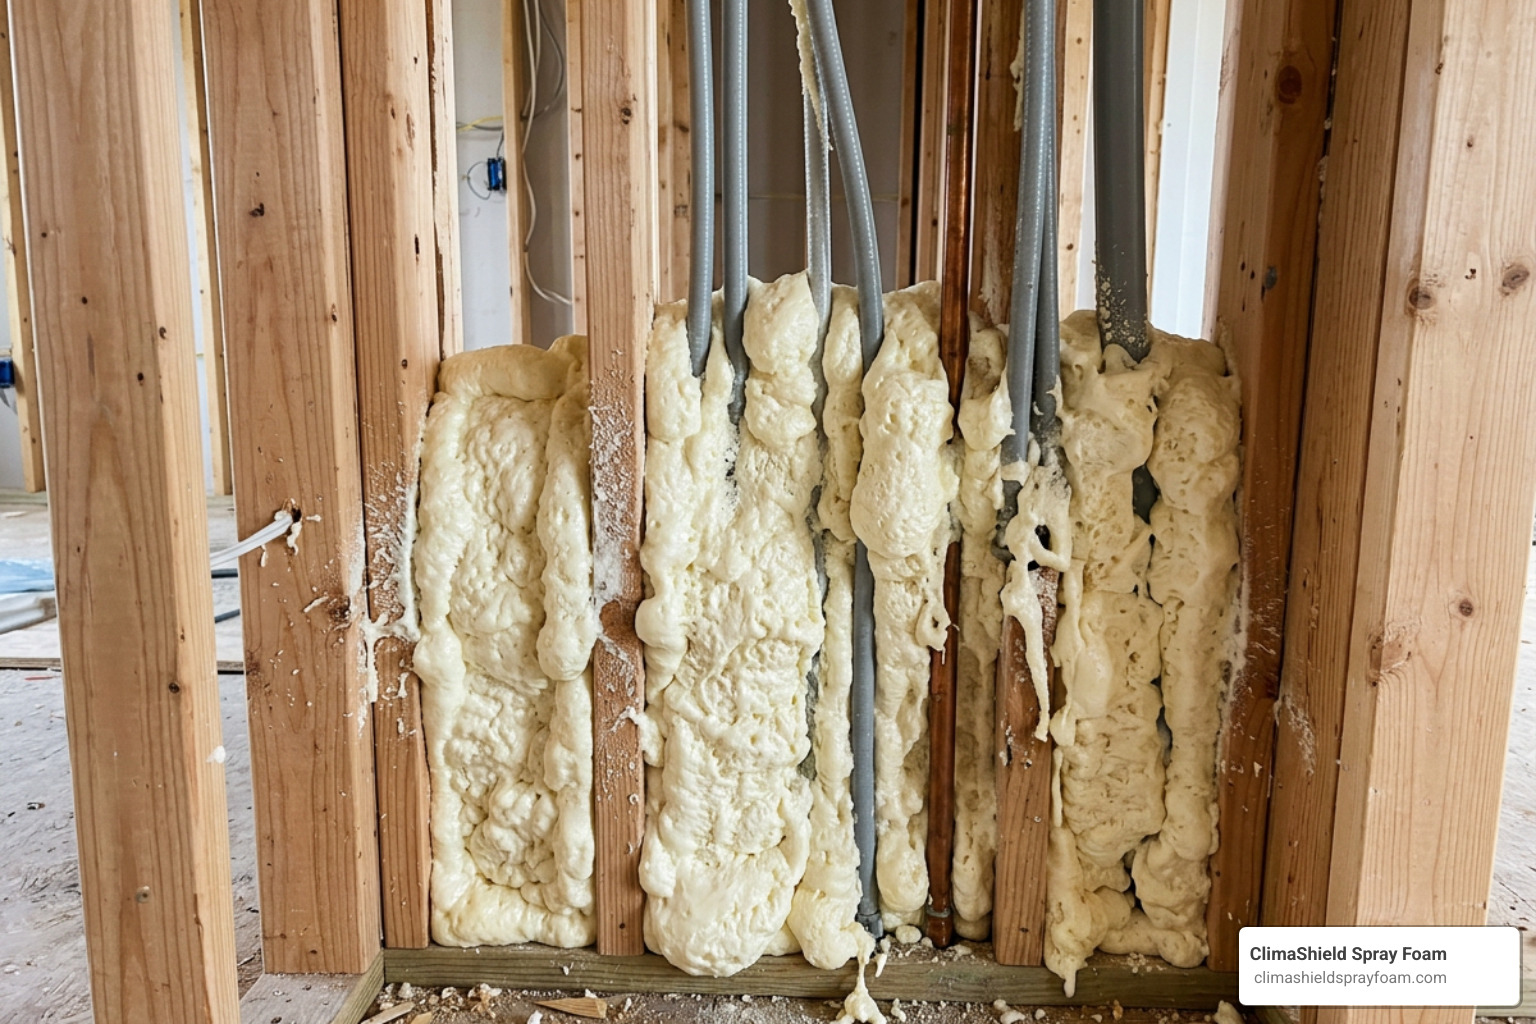
Adding retrofit spray foam insulation to your existing walls is a game-changer because it addresses both heat transfer and air movement simultaneously. As the foam expands inside the wall cavities, it fills every nook, cranny, and gap around electrical outlets, plumbing pipes, and structural framing. This creates a continuous air seal that stops drafty air in its tracks.
By preventing conditioned indoor air from escaping and keeping outdoor air where it belongs, you can significantly lower your heating and cooling demands. This physical air barrier is why upgrading your insulation is one of the most effective ways to Stop Throwing Money Out the Window with Home Spray Foam Insulation.
Comparing Retrofit Spray Foam Insulation to Traditional Materials
Traditional insulation materials like fiberglass batts and loose-fill cellulose have several major limitations when used in retrofits. Over time, these materials are prone to sagging, settling, and leaving empty pockets near the tops of wall cavities. They also act like a giant air filter, allowing drafts to pass straight through them.
Spray foam, on the other hand, is known for its incredible longevity. Once applied, it adheres firmly to the wall framing, maintaining its structural integrity and insulation performance for decades without settling.
Let’s look at how different materials compare when it comes to R-value (the measure of thermal resistance) per inch:
- Closed-Cell Spray Foam: ~6.0 to 6.89 R-value per inch
- Extruded Polystyrene (XPS): 4.76 R-value per inch
- Expanded Polystyrene (EPS): 3.79 R-value per inch
- Glass Fiber (Fiberglass): 3.32 R-value per inch
With closed-cell spray foam, just 3 inches applied inside your wall cavities provides an insulation value of over R-18! This density and thermal performance make a massive difference in tight wall spaces. If you are curious about how these materials stack up in detail, you can read more in our guide on going From Fiberglass to Foam: Exploring Residential Insulation Types. This shows how modern products outperform legacy materials.
Key Benefits of Retrofitting Existing Walls
Beyond the impressive energy savings, retrofitting your home’s walls with spray foam offers several key lifestyle benefits:
- Draft Reduction: Because air leakage is the primary cause of drafts and temperature fluctuations, creating a tight air seal ensures your home maintains a constant, comfortable temperature from room to room.
- Noise Reduction: The dense structure of injection and spray foams acts as an excellent acoustic barrier. It absorbs sound waves, significantly deadening outside traffic noise, barking dogs, and loud neighbors.
- Moisture Control and Mold Prevention: Approximately 70% to 90% of moisture movement through a building’s envelope occurs via air leakage. When warm, humid air meets cold drywall or siding, it condenses into water droplets, which can lead to mold and mildew. By stopping air movement, retrofit foam prevents condensation from forming in the first place.
Choosing the right material for these benefits is easy when you consult The Ultimate Guide to Best Energy Saving Insulation, which highlights how air sealing transforms home comfort.
Understanding the Types of Spray Foam for Retrofits
When planning a retrofit, it is vital to understand that not all spray foams are created equal. The type of foam used depends entirely on whether the wall cavities are open (such as during a full remodel or in an unfinished attic) or closed (existing finished drywall).
Selecting the wrong formulation can lead to incomplete cavity fills or, worse, structural damage to your plaster or drywall due to excessive expansion pressure. This is why Choosing the Right Spray Foam for Your Home is the first step in any successful insulation project.
Open-Cell vs. Closed-Cell Foam in Existing Cavities
Open-cell and closed-cell spray foams have distinct physical properties that make them suitable for different applications:
- Open-Cell Foam (Low-Density): Typically weighing around 0.5 lbs per cubic foot, open-cell foam is incredibly flexible and soft. It expands rapidly to fill large areas and is highly valued for its soundproofing capabilities. However, because it has an open structure, it does not act as a water vapor barrier and has a lower R-value per inch (around 3.5 to 3.6). You can learn more about its unique texture and properties in our article, Why Low Density Foam is the King of Softness.
- Closed-Cell Foam (High-Density): Weighing 2.0 lbs or more per cubic foot, closed-cell foam is dense, rigid, and highly water-resistant. It provides an exceptional R-value of up to 6.89 per inch and adds structural strength to the building. It also acts as an excellent vapor barrier. To understand its heavy-duty performance, read Everything You Need to Know About High Density Foam.
While closed-cell foam is perfect for open cavities, retrofitting it into closed existing walls requires specialized slow-rise formulas to prevent the expanding foam from bowing or cracking your drywall.
The Role of Slow-Rise Polyolymer and Injection Foams
For closed, existing walls, we utilize specialized slow-rise polyurethane foams or foamed-in-place injection foams. Unlike standard fast-expanding spray foams, these injection foams are engineered to expand at a much slower rate.
This controlled, slow expansion allows the foam to flow smoothly around electrical wires, outlets, and plumbing pipes without creating high-pressure pockets that could damage your walls. The liquid foam travels to the bottom of the cavity and slowly rises, filling every empty space before curing. For a deeper look at these different options and their price points, check out Which Foam is for You? Exploring Insulation Types, Perks, and Prices.
Installation Best Practices and Safety Precautions
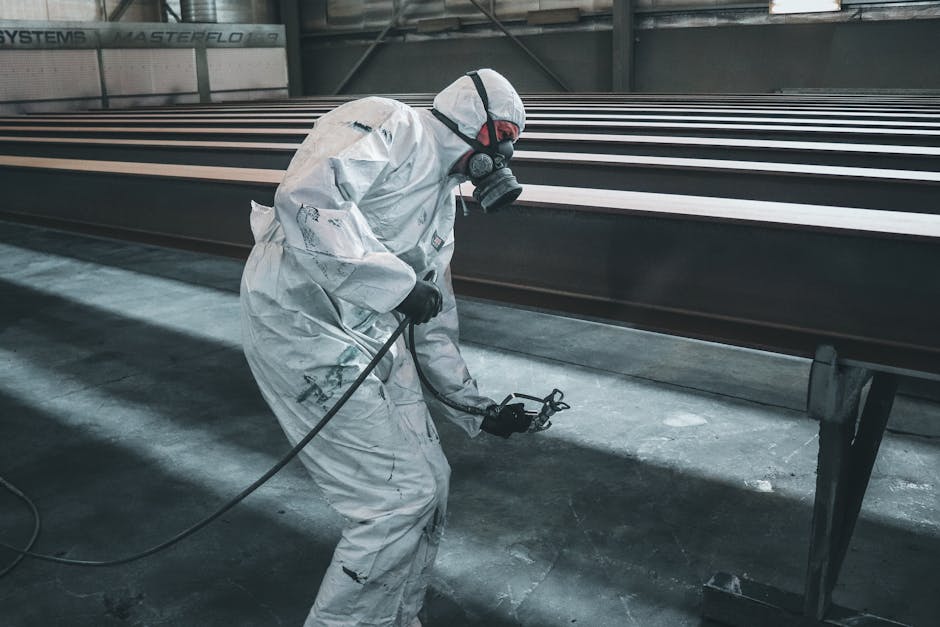
Retrofit spray foam is not a weekend DIY project. It requires specialized high-pressure equipment, precise chemical mixing, and extensive training to ensure the foam cures correctly and safely.
Because the raw chemicals undergo a reaction during application, installers must wear proper Personal Protective Equipment (PPE), including respirators. Additionally, home occupants are typically advised to vacate the property for approximately 24 hours to allow the foam to fully cure and off-gas safely. For detailed technical guidelines, you can reference the Best Practices and Case Studies for Retrofit in Mixed-Humid Climates .
Step-by-Step Process for Installing Retrofit Spray Foam Insulation
A typical professional installation for existing walls follows a clean, highly organized process:
- Preparation and Inspection: We first check the wall cavities for existing insulation, obstructions, or active moisture issues. Any old, moldy, or wet insulation must be addressed.
- Accessing the Cavities: To avoid making a mess inside your living space, we prefer to access the walls from the outside. We carefully remove a strip of exterior siding around the home.
- Drilling Port Holes: We drill a small hole (typically 5/8 inch to 1 inch) into each stud cavity.
- Injecting the Foam: The installer inserts a nozzle and injects the slow-rise foam. To ensure a complete fill, we run the injection hose from the top of the cavity down, filling it systematically.
- Plugging and Sealing: Once the cavity is full, we plug the drilled holes with secure wooden or plastic plugs.
- Reinstalling Siding: Finally, we replace the exterior siding and clean up the work area, leaving your home looking exactly as it did before — only far more comfortable!
In some deep energy retrofits, alternative techniques such as applying foam over existing siding and adding new cladding are used. You can explore these advanced methods via the Spray Foam Insulation Applied over the Siding of Existing Exterior Walls | Building America Solution Center .
When to Avoid Spray Foam in Existing Walls
While spray foam is an outstanding solution for most homes, there are specific scenarios where it should be avoided:
- Active Moisture Leaks: Spray foam should never be applied over active roof or wall leaks, as it can trap water and cause structural wood rot.
- Knob-and-Tube Wiring: Older homes with active knob-and-tube electrical wiring must not be insulated with spray foam. This vintage wiring relies on open air space to dissipate heat; surrounding it with insulation can cause it to overheat and pose a severe fire hazard.
- Structural Damage: If the wall framing is structurally compromised, the pressure of expanding foam can worsen the damage.
Always ensure a professional conducts a thorough pre-insulation inspection to confirm your home is a good candidate. You can learn more about where foam can and cannot be safely used in our guide on the Uses of Spray Foam.
Long-Term Performance, Costs, and Real-World Data
When investing in home improvements, it is essential to look at the long-term data. In Western Pennsylvania’s mixed-humid climate, retrofitting with spray foam provides measurable, long-lasting performance. If you are in the region, working with local experts like ClimaShield Spray Foam in Western PA ensures your project complies with regional building codes and weather demands.
Cost vs. Long-Term Value
There is no sugarcoating it: retrofit spray foam insulation has a higher upfront cost compared to standard fiberglass or loose-fill cellulose. However, because it creates a permanent air seal and does not sag or settle, it offers unmatched long-term value.
While fiberglass may need replacement or top-offs every 15 to 20 years, properly applied spray foam is designed to last up to 80 years! When you factor in monthly energy bill savings of up to 50%, the insulation eventually pays for itself. For a complete financial breakdown of home insulation investments, see our Residential Insulation Complete Guide.
Addressing Shrinkage and Performance Risks
A common concern in the insulation industry is the risk of foam shrinkage. If low-quality tripolymer or injection foams are poorly mixed or installed in wet cavities, they can shrink over time. This shrinkage creates small gaps around the wall studs, which can compromise the air seal.
In a well-documented historic home study, poor-quality retrofit foam shrank significantly, leaving gaps that represented roughly 10% of the cavity volume. This allowed air to bypass the insulation, resulting in a blower door test leakage of 4,300 cfm50 — almost 50% over the target air barrier standard.
However, when high-quality slow-rise polyurethane is installed by certified professionals under correct temperature and moisture conditions, shrinkage is virtually nonexistent. For example, in the Summit House performance case study, the professional application of foam successfully reduced the building’s Air Changes per Hour (ACH at 50 Pa) from a drafty 12 down to an incredibly tight 5.6! This proves that proper installation and material choice are key to achieving a permanent, high-performance air seal.
Frequently Asked Questions about Retrofit Insulation
Can you put spray foam in existing walls without tearing down drywall?
Yes! By using specialized slow-rise injection foam, professionals can access your wall cavities from the exterior of your home. By temporarily removing a strip of siding and drilling small, easily patchable holes, we can fill the cavities completely without disturbing your interior drywall or plaster.
How much can retrofit spray foam save on energy bills?
Homeowners can lower their monthly energy bills by up to 50% (and in some cases up to 60% with a comprehensive air-sealing package). Because the foam stops air leakage, your heating and cooling systems do not have to work nearly as hard to maintain your desired indoor temperature.
Is retrofit spray foam safe for older historic homes?
It can be highly beneficial, but it requires a careful, professional assessment. Older homes must be checked to ensure they do not have active knob-and-tube wiring or hidden structural water damage. When installed correctly, retrofit foam helps preserve historic framing by preventing moisture condensation and drafts.
Conclusion
Upgrading your home with retrofit spray foam insulation is one of the smartest investments you can make for your comfort, health, and wallet. By creating a continuous, durable air seal, you can stop drafts, block outside noise, prevent mold-causing condensation, and slash your energy bills.
At ClimaShield Spray Foam, we specialize in delivering high-quality, durable, airtight insulation solutions tailored to the unique climate of Indiana, PA, and the surrounding Western Pennsylvania region.
Ready to stop throwing money out the window and start enjoying wall-to-wall comfort? Contact us today to schedule your professional home insulation assessment at ClimaShield Spray Foam.
